Difference between revisions of "Laser Cutters"
| Line 102: | Line 102: | ||
===Engrave options=== | ===Engrave options=== | ||
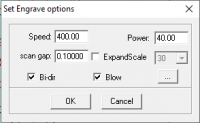
| − | + | [[File:Engrave Options.png|200px|thumb|left|Engrave Options Window]] | |
'''Scan gap''' = the distance between lines in an engraved area | '''Scan gap''' = the distance between lines in an engraved area | ||
Revision as of 01:53, 13 November 2020
G Weike Laser Cutter - Standard Operating Procedure
Model number: LG900N
Company: Jinan G Weike Science and Technology Co., LTD
Bed size: 2’ x 3’ (60cm x 90cm)
Laser Etiquette
Use of the laser is first-come, first-serve. If you are going to be on the laser for a long time (2 hours or more), please notify other members via Slack in #tool-laser. Kwartzlab members have been great at being flexible with use of the laser, often letting others jump in between cuts/engraves if someone has a small job to perform.
Let’s keep this going!
Starting the Laser Cutter
- Check the laser cutter inside and out. Look through the honeycomb grid to make sure that there isn’t excessive detritus. If there is significant build up, then this could be a fire hazard, so you may need to remove the honeycomb and use the vacuum to clean the bed. If you are not comfortable with this since the honeycomb grid is delicate, then find someone who is.
- Check the bed for magnets, material, tape, or other debris that might obstruct the nozzle. Every time the laser is turned on the nozzle automatically returns to the home position (“Datum”- top right of the bed).
- Turn on the laser cutter using your FOB.
- The cooler should register at 19-25C (or ambient air temperature) and the fan should be running
- Feel the air flow near the back of the enclosure to ensure that the air extraction is working properly. Also check for air assist flow at the nozzle (If the laser is on, there should be air coming out), it is to ensure the lens stays clean and doesn’t crack from getting.
Loading Your File
- Open Laser Cut 5.3
- Laser Cut must be started after the laser has been powered on (green light). Otherwise you may receive an error.
- Select your file/design for your project
- Laser Cut project files are saved as .ECP files and can be opened using FILE -> OPEN
- Import your file in one of the supported types. You can import your vector image files in formats like DXF or uncompressed AI. Generally members have the greatest success with .AI, but you’re welcome to go with what works for you.
- Review your design
- Adjust the scale of the file/design if need be
- Press ctrl to preserve aspect ratio
- Press size to determine
- If you have many arrows and/or square dots in your design it may be because the lines in your path are not joined. Go to COMPUTE to see if the lines are joined. If you get a line error, then go to TOOLS → UNITE LINES to merge the lines together.
- Adjust the scale of the file/design if need be
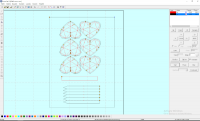
- In your design, set each layer to “cut” or “engrave” and it’s relative speed and power. To distinguish layers for different cuts and/or engraving areas, you may choose different colours at the bottom of the software
- Be sure to scroll the layer window to the right to ensure the layer is enabled.
- When engraving, double click the layer to ensure the scan gap is set to your preferences
- Set the origin relative to the material (preferably the top right corner). The blue dot indicates where the laser will start cutting. Make sure that the “immediate” button is checked.
Starting the Laser Cutter
- Place your material on the bed of the cutter
- You may need to use magnets to keep your material flat. Please use caution when doing so as the nozzle of the laser can hit the magnets when cutting or engraving and cause damage. Consider using painters tape instead of magnets.
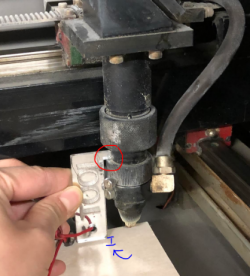
- Use the focus tool (attached between the laser cutter and the computer) to ensure the optimal distance.
- Make sure that the flange on the measuring tool is sitting in the correct groove on the laser arm (red circle). If the material and laser height is not at the optimal distance, then press the Z+ or Z- in the software to move the bed up and down slowly. Once the height is correct, then close the lid.
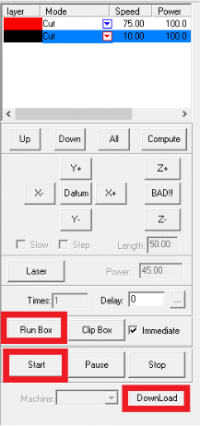
- Press RUN BOX to give an estimate of the perimeter of the cut.
- Press the small clock in the top work bar to estimate the work time required for the laser cutter. Note that the time estimated is usually too conservative and off by 10-20%.
- Go to DOWNLOAD.
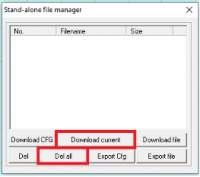
- Go to DEL ALL to remove the previous program or file. If you do not delete the old file, then the software will cut the previous saved design.
- Go to CURRENT. The program will download and process your file//design. After the file/design is downloaded, close the window.
- Go to START and the laser will start run
Clean Up and Turning Off the Laser
- Clean up the laser cutting area with a vacuum if your design had lots of little pieces that could fall into and through the honeycomb.
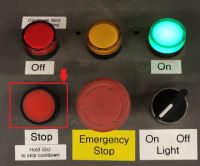
- To turn off the laser cutter, exit the software and press the “stop” button to turn off the machine. A red button will flash while the bulb cools. Note: do not hold down the stop button when you turn off the machine.
LaserCut Software Usage
Zoom in and out: middle scroll button
To distinguish layers, you may choose different colours at the bottom of the software
- Note that a large number of layers (20+) may cause issues with the software. Save often!
Engrave: the laser fills in the area completely
Cut: traces the design
Grade engrave: engraves stuff with a curve on the inside edge (e.g., makes a bathtub groove inside the engraved area)
Datum = move the laser to the top right corner of the bed (go back home)
Press CNTL on the keyboard to preserve aspect ratio when resizing
Press size (button on the left side) to set the exact dimensions
You can change the position of the laser z and y, use z for moving the bed up and down
You can uncheck layers - this is helpful if you have a bounding box and you can check off this laser when you are ready to cut your designs. The size and scale of your design is maintained when layers are turned off.
Press laser to just have a pulse of laser shoot the material to help you with positioning
Soft stop error: When the design is off the bed on the laser, you may receive a soft stop error on the green screen on the laser cutter (not on the desktop/software). If you receive this error, then press the clear button and then figure out what went wrong (usually a positioning error or an origin error). When you determine the issue, then redownload and start the laser
When doing cuts for hard or deep materials, you may indicate that you want to cut the material more than once (scroll right when you are setting the speed and power).
The BAD!!! button is no longer bad for the laser. Avoid pressing it for karmic reasons. :)
If you see a “soft dog” error, then check the USB connection at the back of the computer since it might be loose.
Conner power = corner cut power; you may want to adjust how strong your laser is set depending on the type of material, effect, etc. you desire.
Scan gap = the scan gap is how close your line is during engraving. This number is typically at 0.05 to 0.1 (refer to reference material lasered on birch plywood next to laser).
Unit tolerance = usually 0.010
Scaling
Sometimes, the scale of your file is not faithfully transferred from one software to the other, even though the files are in the same format (e.g., Inkscape). To ensure that your file is the right size, use a bounding box. Make a bounding box by drawing a rectangle around the entire outside of the design in Inkscape. Record the dimensions of that box in millimeters, and then import the file into Adobe Illustrator (AI). In AI, select everything in the laser software and then resize it to the recorded dimension of the rectangle/bounding box so that your design is also the desired size. Make sure that the rulers are set to millimeters in AI as well. Once the bounding box is the correct size, then you may delete the bounding box, leaving your design at the correct size. Export the file from AI, and then import it into the laser cutter software.
Engrave options
Scan gap = the distance between lines in an engraved area
Bi dir = bi directional, disable for plastics if you are running into heat issues on your material, for example bending or warping.
Cut option
Power = is in percentage. 100 power means that the laser is firing at 100% and you can get the laser to cut from 12<p<100%. Note that the power is non-linear
Speed = speed is calculated by mm/min. The lower the speed cut, the slower the laser so the cut may become deeper
- When achieving your desired results, try adjusting the speed of the laser cutter before the power. The speed typically determines how deep of the cut/engraving. If you have fine details to engrave limit to 350mm/s and adjust the power instead.
'Corner power = important for plastic so that you don't overheat plastic along the corners
Icons at the top of the software:
- Ruler: Use to measure distances (?)
- Clock: Estimate the work time required for the laser cutter. Note that the time estimated is usually too conservative and off by 10-20%.
Materials
Flat materials are ideal and strongly recommended. Warped materials can be flattened with magnets, but use them with extreme caution. Magnets in the path of the laser can damage the nozzle. Material that is cut can warp up into the path of the laser nozzle also causing damage. Flat material is best!
Circular materials can be cut using the rotary attachment, reach out on the laser channel for help setting it up.
Some common materials used by the laser cutter include acrylic, MDF, plywood, etc. at 3-4mm in thickness.
Due to the variation in materials from manufacturer, humidity, density, etc., you should do test batches to ensure the desired results.
Max size is 60x90 cm or 2’ x 3’
Recommended locations for purchasing materials
| Material | Location |
|---|---|
| Wood hardboard |
|
| Plastics |
|
Acrylic (PMMA): There are two types of acrylic: extruded vs cast. Both cut cleanly, but will produce different results on engraving
- Extruded plastics engraved properly will leave a clear finish on top, which is not easy to see on it’s own, and will not edge light. It can also produce a white floss (the white whispy strings of plastic coming off the surface) during the engraving process.
- Cast acrylic will make a shiny reflective surface on top that is obvious and visible and will edge light nicely.
- Burn marks: Burns marks might appear behind the cut. To protect the surface of your material, you can tape (use painter’s tape) on the back of the material. If you are cutting a plastic board, then keep the film that it came in on the plastic board to protect the back from creating white floss.
Notes relating to the laser cutter hardware
- Vent/filter/honeycomb bed: Do not expect that the vent/filter on the bed of the laser cutter is squared to anything. This vent/filter is moveable and requires regular cleaning. If there are lots of little bits in the vent/filter, then clean it up by using the brushes in the computer station. If necessary, use the assigned vacuum and lift the vent/filter to vacuum the dust.
- The cutting bed is 60cm by 90cm
- The blower/fan above the ceiling has a mesh filter that becomes clogged over time. If you notice a smoke buildup in the laser during operation, it is likely due to this filter clogging. Please notify the laser team if this is occurring. If you feel comfortable, the process for cleaning the filter with a vacuum is posted on the wall next to the duct leading to the blower.
Safety
- Fire: Be sure to always be in clear view of the laser cutter as fire is a very real and dangerous reality. If there is a significant fire, press the small “STOP,” then “DATUM” button on the software and put out the fire with one of the 2 CO2 fire extinguishers available. Be sure to familiarize yourself with where the “STOP” button and the “DATUM” button is on the machine and software, respectively. For a small fire, you can try to blow out the flame.
- Do not use any material that might have chlorine. You can check by heating a copper wire in a flame, touching the material, and then reheating the copper wire. If the flame emits a green colour then there is chlorine in the material. ([[1]])
