¶ Quick Info and Links
- Company: Jinan G Weike Science and Technology Co., LTD
- Model number: LG900N
- Controller: RuiDa 6442G (non-original)
- Power: Approximately 80W
- Bed size: 550mm x 900mm (roughly 21" x 36")
- Laser Computer Software: Lightburn DSP 1.0.06 (dl link for setting up files at home)
- Device file: media:KLab_Official_G_Weike.lbdev (if installing Lightburn at home, download this, then import and select it when Lightburn first runs)
¶ G Weike Laser Cutter - Standard Operating Procedure
¶ Laser Cutter Prestart
- Check the laser cutter inside and out. Look through the honeycomb grid to make sure that there isn’t excessive detritus. If there is significant build up, then this could be a fire hazard, so you may need to remove the honeycomb and use the vacuum to clean the bed. If you are not comfortable with this since the honeycomb grid is delicate, then find someone who is.
- Check the bed for magnets, material, tape, or other debris that might obstruct the nozzle. Every time the laser is turned on the nozzle automatically returns to the home position (“Datum”- top right of the bed).
- Turn on the laser cutter using your FOB.
- The cooler should register at 19-25C (or ambient air temperature) and the fan should be running
- Feel the air flow near the back of the enclosure to ensure that the air extraction is working properly. Also check for air assist flow at the nozzle (If the laser is on, there should be air coming out), it is to ensure the lens stays clean and doesn’t crack from getting.
¶ Starting the Laser Cutter
- Wait for the laser head to stop moving (sometimes it pauses for a second and then homes itself, just give it 30 seconds to make sure it has moved out of the way)
- Place your material on the laser bed
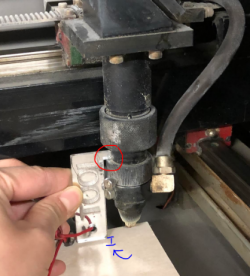
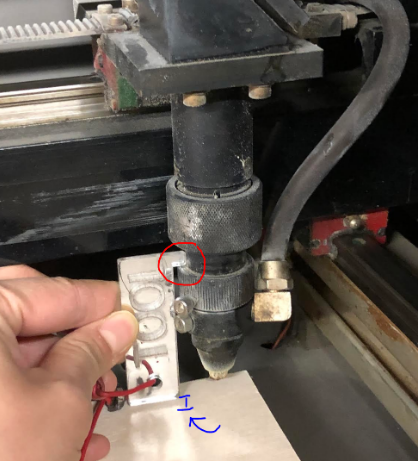
- Use the laser focus tool to set the Z height for your material (pictured right) This is imperative in order to get a quality cut.
- Prepare your file in Lightburn for cutting (this is often completed ahead of time before you turn the laser on, but can be done after as well)
¶ Clean Up and Turning Off the Laser

- Clean up the laser cutting area with a vacuum if your design had lots of little pieces that could fall into and through the honeycomb.
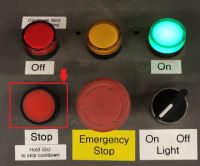
- To turn off the laser cutter, exit the software and press the “stop” button to turn off the machine (see picture on right). A red button will flash while the bulb cools. Note: do not hold down the stop button when you turn off the machine.
¶ Materials
Flat materials are ideal and strongly recommended. Warped materials can be flattened with magnets, but use them with extreme caution. Magnets in the path of the laser can damage the nozzle. Material that is cut can warp up into the path of the laser nozzle also causing damage. Flat material is best!
Circular materials can be cut using the rotary attachment, reach out on slack, #area-laser, for help setting it up.
Some common materials used by the laser cutter include acrylic, MDF, plywood, etc. at 3-4mm or 1/8" in thickness.
Due to the variation in materials from manufacturer, humidity, density, etc., you should do test batches to ensure the desired results.
Max size is 60x90 cm or 2’ x 3’
Do not cut or etch/engrave any material that might have chlorine. You can check by heating a copper wire in a flame, touching the material, and then reheating the copper wire. If the flame emits a green colour then there is chlorine in the material. See Beilstein Test and a video demonstration.
APPROVED MATERIALS
- Solid wood (thickness varies depending on species)
- Plywood
- MDF
- Hardboard
- Acrylic (PMMA): Extruded and cast (both allowed)
- Fabric
- Felt
- Leather
- Paper/Cardboard/bristol board/and other paper based products
- Stamp materials (specifically designed for laser cutters)
- Foam-core (high fire risk, don’t take your eyes off it for a moment)
- Foam (test for chlorine before cutting)
- Rubber (test for chlorine before cutting)
MATERIALS THAT CAN ONLY BE ENGRAVED OR ETCHED:
- Glass
- Anodized aluminum (the laser ablates the anodized outer layer)
- Painted metal - The paint is removed, but the metal is unaffected
MATERIALS THAT ARE NOT ALLOWED
- Anything containing chlorine
- ABS plastic (It doesn’t cut well, makes a mess, and smells very bad)
- Ceramic tile
- Polycarbonate
- PVC plastic
- Electrical tape
- Vinyl records
- Food
- Humans, whole or in part
- Slate and some other types of stone
Recommended locations for purchasing materials
| Material | Location |
|---|---|
| Hardboard (1/8" and 1/4") |
|
| MDF (1/8" and 1/4") |
|
| Acrylic (1/8" and 1/4") |
|
| Laserply (1/8" only) |
|
| Plywood (1/8" and 1/4") |
|
Acrylic (PMMA): There are two types of acrylic: extruded vs cast. Both cut cleanly, but will produce different results on engraving
Extruded plastics engraved properly will leave a clear finish on top, which is not easy to see on it’s own, and will not edge light. It can also produce a white floss (the white whispy strings of plastic coming off the surface) during the engraving process.
Cast acrylic will make a shiny reflective surface on top that is obvious and visible and will edge light nicely.
- Burn marks: Burns marks might appear behind the cut. To protect the surface of your material, you can tape (use painter’s tape) on the back of the material. If you are cutting a plastic board, then keep the film that it came in on the plastic board to protect the back from creating white floss.
¶ Material Power Speed Guidelines
NOTE These are starting points. Adjustments will be necessary based on variations in material, alignment of mirrors, age of the laser tube, and other factors. NEEDS UPDATING
| Type | Material | Speed | Power |
|---|---|---|---|
| Cut | 3mm MDF | 18 | 100 |
| Cut | 1/4" MDF | 4 | 100 |
| Engrave | MDF | xx | xx |
| Cut | 3mm Baltic Birch Plywood | 18 | 100 |
| Cut | 1/8" Baltic Birch Plywood | 12 | 100 |
| Engrave | Baltic Birch Plywood | xx | xx |
| Cut | 3mm Acrylic | 18 | 100 |
| Cut | 4.5mm Acrylic | 6 | 100 |
| Engrave | Acrylic | xx | xx |
There's a chart with relatively good starting points available here (our laser is roughly 80 Watts): https://www.cs.cmu.edu/afs/cs/academic/class/99353-f16/speedsfeeds_RL.pdf
Add some notes about scan gap here
¶ Notes relating to the laser cutter hardware
- Vent/filter/honeycomb bed: Do not expect that the vent/filter on the bed of the laser cutter is squared to anything. This vent/filter is moveable and requires regular cleaning. If there are lots of little bits in the vent/filter, then clean it up by using the brushes in the computer station. If necessary, use the assigned vacuum and lift the vent/filter to vacuum the dust.
- The cutting bed is 60cm by 90cm
- The blower/fan above the laser has an intake grate that becomes clogged over time. If you notice a smoke buildup in the laser during operation, it is likely due to this grate clogging. Please notify the laser team if this is occurring. If you feel comfortable, the process for cleaning the grate with a vacuum is posted on the wall next to the duct leading to the blower.
- There is a white box in-line with the ducting to the exhaust blower. This was from an attempt to filter the exhaust before sending it out into the wide world, but the number of filters we were going through was unsustainable.
- There is a simple pressure indicator (a liquid column manometer) installed on the filter box. When the blower is off, the liquid in the two sides of the tube should be level. When the blower is running, there should a difference of a couple inches.
¶ Safety
- Fire: Be sure to always be in clear view of the laser cutter as fire is a very real and dangerous reality. If there is a significant fire, press the emergency stop button and put out the fire with one of the 2 CO2 fire extinguishers available. For a small fire, you can try to blow out the flame.
- Do not use any material that might have chlorine. You can check by heating a copper wire in a flame, touching the material, and then reheating the copper wire. If the flame emits a green colour then there is chlorine in the material. See Beilstein Test and a video demonstration.
¶ Controller Manual
The controller is not the original, and has been updated to a RuiDa 6442G Laser Controller. The manual is available on Google Drive.
¶ Replacement Parts
See Replacement Parts.